Saturday, September 30, 2006
Aviation sectionals update
Just an update on my earlier post. Boeing is closing down connixion. I talked to a representitive about it, and they plan to just unplug it. No selling off assets, Just unplugging. So much potential -- soon to be gone.
Monday, September 25, 2006
Why I Fly (chapter 10)
All my stories start with a lead-in something like “A long time ago in a galx…” No wait, that’s a different story. More like this: Earlier this summer we went to Oregon to visit my sister in Lincoln City. On the way down we stopped at the Tacoma Museum of Glass, Fort Vancouver, Pearson Air Park and Museum, and Evergreen Aviation Museum. And yes, I see the trend developing here. We had a nice visit with my sister, and on the way home we stopped at the Tillamook Cheese Factory.
In the process of going to the cheese factory, we drove right past the Tillamook Air Museum. I knew it was the right thing to do, mostly because my wife, Sandra, had been such a good sport about the other airplane museums, and she wanted to see the cheese factory. Turns out the cheese factory is pretty cool and we got some pretty good pepperjack cheese out of the deal, so in the end I was happy we went.
This Sunday it was a severe-clear day. Early fall, just a hint of trees changing colors here and there, and short-sleeve weather. Great weather for flying. About 10:am we finally got out the door and headed to the airport to climb aboard the trusty steed. After moving a car-seat from the van to the plane, loading up with the requisite in-flight entertainment (a bag of books and toys for the kids), and picking up my clearance, we were off the ground about 10:45.
The flight was really uneventful. Blue above, green below. The islands and peninsulas of the Puget Sound created patterns in the blue green water surrounding them. The mountains on the left rose with their peaceful majesty along the Cascades. The Olympic Range on the right faded into the rolling fir covered hills of the Costal Range. The Capitol building in Olympia sat nestled next to the bay. The rolling hills giving way to the Columbia River, and the long span bridge at Astoria. Soon we were paralleling the coast over Seaside and Cannon Beach, looking down on Haystack Rock, and then descending over Tillamook Bay to land.
Just after noon we touched down at Tillamook, and then we touched down again, and again (ok, not one of my better landings). The runway end yielded to a serpentine strip of blacktop that lead to the museum where we shut down and went inside for lunch.
The airplane collection is good. In the hangar they have a pretty good selection of WW-II aircraft, and a couple of surprises were an F-14 Tomcat (of Top-Gun fame), an A-7 Corsair, and a MiG-15. But the real star of the museum was the building housing the collection. This is a wooden structure that is nearly a football field wide (297 ft), nearly a fifth of a mile long (1,072 ft) and 15 stories high (192 ft). And is all open free span in the inside. It is the largest wooden free-span structure in the world. The airplane collection takes up about half of the available space. The building was built to house eight or nine of the 17 blimps that were used to patrol the west coast during WW-II. There were two built, and the first took nine months. The second was put up in 29 days. Wow.
After wandering around the airplanes, taking in the sights of the trains nearby, and talking to the pilot selling rides in his open cockpit biplane, we made one last potty stop and buckled back into the plane.
We took off to the north staying a couple thousand feet over the city where we crossed over the cheese factory. We then climbed up to 4,500 feet, our cruising altitude for the ride home.
We ran our course backwards to the Hood Canal Floating Bridge, then turned right and headed across the Puget Sound. But instead of going to the airport, we made a couple of turns around my youngest son’s gymnastics building in Mountlake Terrace, and then headed north and set up for our landing. (much better this time).
By 5:15 we were home, and getting ready for the busy week ahead.
Today, my son is pretty excited. He tells me that one of his friends from school was at the Cheese Factory at the same time we were at the Air Museum. (no, they did no see us fly over.) Sandra smiled at me and said “They got home at 10:00 last night.”
A good adventure, beautiful scenery, a brush with history, and back home for an evening movie. And that is just one more reason why I fly.
Friday, September 15, 2006
Replacing the Ford F-250 Super Duty Side Mirrors.
I was picking up my son the other day when my neighbor called. She said that my truck rolled down the hill by itself and backed into some brush next to her driveway.
 When I got there, the truck was embedded firmly into the brush, still locked up. Oddly the drivers-side mirror was folded against the side of the truck. After a brief inspection, I unlocked the truck and drove it back to it's parking space.
 Shortly after, I found the culprit -- the end had come off the parking brake cable where it attaches to the pedal. By the way, the Department of Transportation keeps track of such events. If you have a brake failure of any sort, you should report it.
The sudden stop is what caused the mirror to fold up, and in the jolt, a small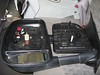 clip broke. It looks like about 15 cents worth of plastic -- but I'd been willing to pay a couple bucks for it. But you cannot buy just the clip, you must buy the whole $235.00 mirror assembly. I tried junk yards, but none locally had one.
So here is how to replace a mirror.
Preparing to reinstall the new mirror.
When I got there, the truck was embedded firmly into the brush, still locked up. Oddly the drivers-side mirror was folded against the side of the truck. After a brief inspection, I unlocked the truck and drove it back to it's parking space.Shortly after, I found the culprit -- the end had come off the parking brake cable where it attaches to the pedal. By the way, the Department of Transportation keeps track of such events. If you have a brake failure of any sort, you should report it.The sudden stop is what caused the mirror to fold up, and in the jolt, a small
clip broke. It looks like about 15 cents worth of plastic -- but I'd been willing to pay a couple bucks for it. But you cannot buy just the clip, you must buy the whole $235.00 mirror assembly. I tried junk yards, but none locally had one.So here is how to replace a mirror.
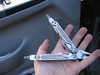 Get out your tools. I used a flat head screwdriver, a Phillips screwdriver, a 1/4 inch drive ratchet, socket driver, extention, and sockets sized 7/32, 9/32, and 7/16.
 - Roll down the window.
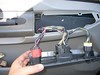
 Remove mirror nut cover. This is just pressed into place. Grasp firmly and pull it straight out from the window. Set the cover off to the side.
- Remove grommets and cut openings in the adhesive padding.
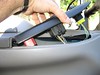 Remove the Switch panel from the armrest. Grasp near the front and pry it up and back. There is a tab on the back that catches under the rest of the armrest. Disconnect the wiring junctions from the switch panel. Set the panel off to the side.
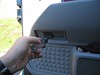
 Pry the reflector off of the lower corner of the door -– I used a flathead screwdriver -- exposing the bolt. Set the reflector off to the side. Remove the 9/32 bolt and set it off to the side.
 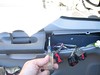 Remove the 9/32 bolt from the rear of the switch panel opening and set it off to the side.
- Grasp the door panel and lift it straight up and off the door. Be careful of the lock tab that pokes out the top to make sure you don't get hung up on it. Set the door panel off to the side.
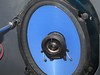 Remove the door speaker. If there is not a quick disconnect for the wiring stick the speaker magnet to the door.
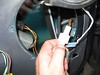 Reach in through the speaker opening and disconnect the mirror power control wires. I found it is easer if I pull it off the mount in the door first.
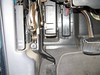
 - Remove the four 7/16 nuts holding the mirror on to the door (they are behind the holes you cut and the grommets you removed). If you take them out from the bottom up, the mirror will be supported better until the last one is removed. As you remove the final nut, reach through the open window to support the mirror so it does not fall.
- Carefully extract the wiring from the opening in the door.
- Set the old mirror aside.
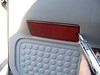
There are no nuts in the mirror kit, so if you drop the nuts into the door, you will need to do the two steps below to be able to get them out. If you do not, you can skip the next 2 optional steps. 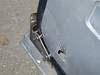 (optional) Loosen the plastic cover on the lower rear of the door by removing the 2 Phillips screws
 - (optional) CAREFULLY peel the adhesive padding up exposing the openings in the lower portion of the door.
Preparing to reinstall the new mirror.
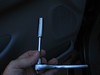
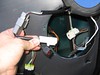 Install the adapter. Ford decided that using a single type of connector was too simple, so when you install the new mirror, it has a different connector on it than the old one. So you have to start by installing the adapter.
 - Zip-strip the adapter to the other wires in the door to keep it from falling into the window track.
- Reverse the step above.
Subscribe to:
Posts (Atom)